
How was it made?
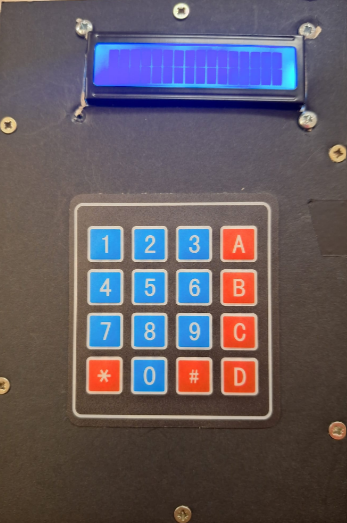
The arduino calculator was made by make making a 12 by 16 cm frame. then i covered the frame with mounting board and cut out some holes for a lcd screen and keypad. I then bloted the lcd screen to the mounting board and stuck the keypad to the mounting board by peeling back the sticker at the back.I then installled an arduino and conected all of the jumper wires to the arduino.
Materials list
| Name | Price | Link |
|---|---|---|
| Keypad | £4.49 | Click Here |
| LCD screen | £7.95 | Click Here |
| Arduino Uno Board | £12.10 | Click Here |
| Jumper wires | £4.58 | Click here |
| Power cable for Arduino | £3.99 | Click here |
| 9v battery | £6.29 | Click here |
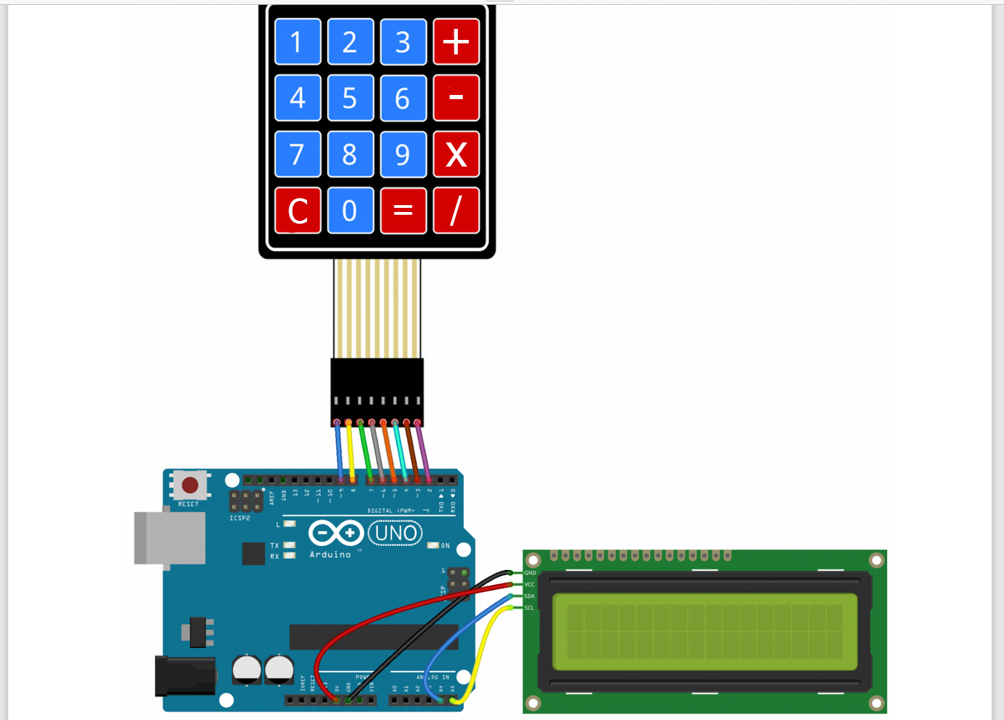
Circuit plan
Hardware Tutorial
I got the idea when I was putting up my Christmas tree. I thought what if I made a smaller tree with LED’s.
- first i needed to made a wooden frame i cut 4 pices of wood 2 of them 12 cm and the other two 16cm.
- Then i sanded all of the wood.
- Next i drilled some holes and countersunk them so that the screws are flush to the wood. i then screwed some 2cm screws into each hole
- Then i traced around the frame onto some mounting board on each side. on the front i also cut out a hole for the lcd and keypad
- Then i screwed all of the sides on to the wooden frame with some 1cm scews and a 1.5 mm drill bit
- The i installed the lcd screen by using 4 bolts.
- I then installed the keypad by peeling of the sticky back and sticking it on to the mounting board
- I then pugged all of the jumper wires into the arduino and using the wiring diagram above
Software Tutorial
arduino calucator full code - click here
Now we have done the hardware tutorual we now need some code to make it work copy this code into arduino ide and upload it to your arduino you will also need to install the keypad and lcd library
Ardino calculator code
#include
#include

const byte ROWS = 4;  // Number of rows on the keypad
const byte COLS = 4;  // Number of columns on the keypad

char keys[ROWS][COLS] = {
  { '1', '2', '3', '+' },
  { '4', '5', '6', '-' },
  { '7', '8', '9', '*' },
  { 'C', '0', '=', '/' }
};

byte rowPins[ROWS] = { 9, 8, 7, 6 };  // Connect keypad ROW0, ROW1, ROW2 and ROW3 to these Arduino pins
byte colPins[COLS] = { 5, 4, 3, 2 };  // Connect keypad COL0, COL1, COL2 and COL3 to these Arduino pins

Keypad keypad = Keypad(makeKeymap(keys), rowPins, colPins, ROWS, COLS);

LiquidCrystal_I2C lcd(0x27, 16, 2);

String input = "";
char* expressionToParse;
bool cleared = true;

void setup() {
  lcd.init();
  lcd.backlight();
}

void loop() {
  char key = keypad.getKey();

  if (key != NO_KEY) {

    if (!cleared) {
      clearDisplay();
    }

    if (key == '=') {
      calculateResult();
    } else if (key == 'C') {
      clearDisplay();
    } else {
      lcd.print(key);
      input = input + key;
    }
  }
}

  void calculateResult() {
    lcd.setCursor(0, 1);
    lcd.print("Result:");

    input.trim();

    expressionToParse = input.c_str();
    lcd.setCursor(8, 1);
    float result = expression();
    if(isinf(result) == 0 && isnan(result)==0){
      lcd.print(result);
    }else{
      lcd.print("Invalid");
    }
    cleared = false;
  }

  void clearDisplay() {
    lcd.clear();
    input = "";
    cleared = true;
  }

  char peek() {
    return *expressionToParse;
  }

  char get() {
    return *expressionToParse++;
  }

  float number() {
    float result = get() - '0';
    while (peek() >= '0' && peek() <= '9') {
      result = 10 * result + get() - '0';
    }
    return result;
  }

  float factor() {
    if (peek() >= '0' && peek() <= '9')
      return number();
    else if (peek() == '(') {
      get();  // '('
      float result = expression();
      get();  // ')'
      return result;
    } else if (peek() == '-') {
      get();
      return -factor();
    }
    return 0;  // error
  }

  float term() {
    float result = factor();
    while (peek() == '*' || peek() == '/')
      if (get() == '*')
        result *= factor();
      else
        result /= factor();
    return result;
  }

  float expression() {
    float result = term();
    while (peek() == '+' || peek() == '-')
      if (get() == '+')
        result += term();
      else
        result -= term();
    return result;
  }

}
Testing and observation
- The Lcd backlight worked well even though some of it was covered
- The keypad worked well and it stuck down well with the stick back on the back of it
- it can proform calculations easy and eficiantly
Challanges
- fittng a back because there was no room for a back
- programming it because this is my first time using a lcd screen and keypad
Future Changes
- make the frame a bit thicker to add a back
- have a smaller arduino to make it thinner
- add some more buttons on the top for reset and other tings so i can do decimal points on the calculator
Conclusion
The calculator works well and performs complex calculations